
Zero downtime CI/CD with GitHub Actions


An important part of any project is how to deploy it in a simple, effective and hopefully quick manner. As part of development for Linquito, on a relatively small side-project budget, we needed a cheap, elegant & reliable solution. As a nice-to-have, we also ideally wanted zero downtime deployments.
In this article we will be exploring how Linquito build a robust CI/CD process using GitHub Actions and Deployer.
Prerequisites
- A GitHub account.
- A project you wish to launch a VPS/EC2 container or equivalent.
- SSH access to your VPS/EC2 and basic UNIX knowledge.
- Understanding how to write/read YAML (basic knowledge is sufficient).
- Basic knowledge of Git and GitHub.
- Basic understanding of the Deployer library.
GitHub Actions
After evaluating several solutions, GitHub actions seemed like the clear winner to get Linquito off the ground. With GitHub Actions we can have the deployment, testing and project integration in one place, and tracked in our codebase! Best of all, GitHub Actions fits the cheap criteria as you’re billed per minute and it includes an attractive 2,000 free minutes per month per repository (at the time of writing). Other key benefits include:
- Your runner supports multiple environments including: Linux, Windows, macOS, ARM, and other containers.
- Concurrency - multiple jobs can run simultaneously (however you can prevent jobs running concurrently if required).
- Multiple language support including Node.js, PHP, Python, Java, Ruby, Go, Rust etc.
- Live logs; watch your actions run and their logs in realtime!
- Easily manage secrets (although modifying existing secrets at the time of writing isn’t supported - you have to replace existing secret’s values so keep that in mind).
- 2,000 free minutes per month with the ability to pay for additional minutes or run the GitHub runners locally/hosted for free!
Deployer
Deployer is a great tool written in PHP that can be used to deploy your application to your server(s). It supports many applications such as Laravel, Symfony and more. One of the greatest benefits with Deployer is it carries out a lot of the SSH commands for you in addition to sorting out permissions, so if your UNIX/Linux skills aren’t advanced or you still struggle with Linux permissions this can be a real time saver.
Lastly, it supports zero-downtime deployments. This means we can deploy our application without it ever being taken offline, when the app is built it is seamlessly deployed by switching a symbolic link on the server. Likewise, if the deployment fails it automatically rolls back to the previous deployment so users shouldn’t be affected!
Note that Deployer is great for deploying your application onto a single (or multiple) EC2/VPS/Server instances. However, it may not be the best tool for more advanced projects making use of Docker, Kubernetes or other container orchestration services.
The plan
For Linquito we have two environments; staging and production (this is typical of many projects). For our GitFlow we decided on adopting GitHub Flow. GitHub Flow is a nice, simple GitFlow where essentially features and bug fixes are branched off master and merged back into master upon completion (and satisfying testing, QA etc.). Therefore in our instance the master branch is our single source of truth for our code base. This is the same for both our backend and frontend codebases (Linquito is a headless API based app with a Vue frontend and Laravel backend).
Testing on pull requests
The first part is to test the application using GitHub actions. For this we will need to create a new workflow. A workflow on GitHub Actions is defined as “custom automated processes that you can set up in your repository to build, test, package, release, or deploy any project on Github”.
Workflows are defined in YAML files and located in the root of your repository inside a .github/ folder. So let’s create a new workflow .github/tests.yml.
Workflows are event based, in this instance we want it to react on pull requests, but only to the master branch. We can set this up with the following:
name: linquito-testing # The name of the workflow that appears on GitHub
on:
  pull_request:
    branches:
      - master # The branch the PR should merge into to initiate this action
# Note you can add additional branches here by adding more to the list

jobs:
	linquito-unit-tests:
	# This is where we define the steps to run in our job, currently empty
The above is a simple boilerplate YAML file that will run the linquito-unit-tests job every time there is a pull request into the master branch. Now let’s populate the steps required to run our tests!
name: linquito-testing # The name of the workflow that appears on GitHub
on:
  pull_request:
    branches:
      - master # The branch the PR should merge into to initiate this action
# Note you can add additional branches here by adding more to the list

jobs:
	linquito-unit-tests:
	runs-on: ubuntu-latest # This is the name of the runner the job will run on

	services:
	# Here we specify services we want to run, in this case we need MySQL 5.7
		mysql:
      image: mysql:5.7
      env:
        MYSQL_ROOT_PASSWORD: "topsecretpasswordhere"
        MYSQL_DATABASE: your_testing_database_name
      ports:
        - 33306:3306
      options: >-
        --health-cmd="mysqladmin ping"
        --health-interval=10s
        --health-timeout=5s
        --health-retries=3
	# Steps are the sequence of tasks to be executed as part of the job
  steps:
    # This will check out your repo under $GITHUB_WORKSPACE so your job can access it
    - uses: actions/checkout@v2
    - uses: shivammathur/setup-php@v2
      with:
        php-version: '7.4' # Here we can target a specific version of PHP and composer
        tools: composer:v1

    - name: Copy .env
      run: php -r "file_exists('.env') || copy('.env.example', '.env');"
    - name: Install Dependencies
      run: composer install -q --no-ansi --no-interaction --no-scripts --no-progress --prefer-dist
    - name: Generate key
      run: php artisan key:generate
    - name: Directory Permissions
      run: chmod -R 777 storage bootstrap/cache
    - name: Execute Tests
      run: |
        php artisan config:clear
        php artisan migrate --seed --no-interaction
        vendor/bin/phpunit
      env:
        DB_CONNECTION: mysql
        DB_DATABASE: your_testing_database_name
        DB_HOST: 127.0.0.1
        DB_USERNAME: root
        DB_PASSWORD: topsecretpasswordhere
        DB_PORT: 33306
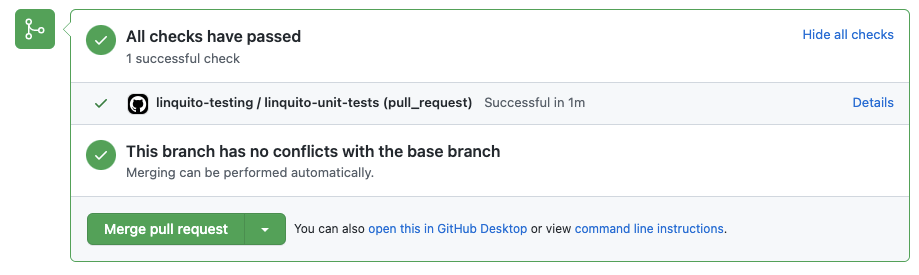
Now when we create new pull requests our action will run. You can setup your repository to block merging until all actions are successful to prevent broken code hitting production.
Automatic deployment to staging
Next on our list is the ability to deploy our updated codebase onto our staging server after the unit tests have successfully completed. For this we can create a separate GitHub action workflow .github/workflows/staging.yml.
For the following workflow, we are using GitHub secrets which look like ${{ secrets.SECRET_NAME }}. Note that need to set up your SSH_ID_RSA_PRIVATE and SSH_STAGING_KNOWN_HOSTS secrets on GitHub in order for Deployer to be able to SSH onto your server.
name: linquito-deploy-staging

# Runs when a new PR is merged to the master branch
on:
  push:
    branches:
      - master

jobs:
  linquito-deploy-staging:
    runs-on: ubuntu-latest
    steps:
      - uses: actions/checkout@v2
      - uses: shivammathur/setup-php@v2
        with:
          php-version: '7.4'
          tools: composer:v1
      - name: Install Dependencies
        run: composer install -q --no-ansi --no-interaction --no-scripts --no-progress --prefer-dist
      - name: Setup Deployer # Here we setup deployer as we need this to deploy
        uses: atymic/deployer-php-action@master
        with:
          ssh-private-key: ${{ secrets.SSH_ID_RSA_PRIVATE }}
          ssh-known-hosts: ${{ secrets.SSH_STAGING_KNOWN_HOSTS }}
      - name: Deploy codebase
        env:
          SLACK_WEBHOOK: ${{ secrets.SLACK_WEBHOOK }}
        run: dep deploy staging --tag=${{ env.GITHUB_REF }} -vvv
Next, we need to create our Deployer php configuration file. You can see from above dep deploy staging . Staging is a stage in the defined hosts so that Deployer knows what server(s) to target and deploy to. This is defined by the hosts section in your deploy.php file. We only have two servers for Linquito (at the time of writing) if you were to implement this for your application you will need to change your server IPs and the deploy_path and domain_path to fit your needs.
// Hosts
host('staging-api.linquito.com')
    ->hostname('255.255.255.254')
    ->stage('staging')
    ->user('ubuntu')
    ->set('deploy_path', '/var/www/staging-api.linquito.com')
    ->set('domain_path', 'staging-api.linquito.com');

host('production-api.linquito.com')
    ->hostname('255.255.255.255')
    ->stage('production')
    ->user('ubuntu')
    ->set('deploy_path', '/var/www/production-api.linquito.com')
    ->set('domain_path', 'production-api.linquito.com');
In our deploy.php we are also using the Slack recipe so that we get a confirmation message every-time we successfully deploy. If you wish to use this you will need to set your slack_webhook otherwise you can simply remove the Slack recipe and any other Slack tasks.
The deploy.php file template you can use should look like the following, you can adjust it to your site’s needs but this should work with a typical Laravel application:
<?php

namespace Deployer;

require 'recipe/laravel.php';
require 'recipe/rsync.php';
require 'recipe/slack.php';

set('application', 'Linquito');
set('ssh_multiplexing', true);
set('keep_releases', 3); // Number of releases to keep on the server

set('slack_webhook', 'https://hooks.slack.com/services/your-slack-webhook');

set('rsync_src', function () {
    return __DIR__;
});

// Here you can specify any files or folders to exclude from being copied over toyour server
add('rsync', [
    'exclude' => [
        '.git',
        '/.env',
        '/storage/',
        '/vendor/',
        '/examples/',
        '/node_modules/',
        '/docker/',
        '.github',
        'deploy.php',
        '/public/storage',
        '/public/packages/',
    ],
]);

// Laravel shared file
set('shared_files', [
    '.env',
]);

// Hosts
host('staging-api.linquito.com')
    ->hostname('255.255.255.254')
    ->stage('staging')
    ->user('ubuntu')
    ->set('deploy_path', '/var/www/staging-api.linquito.com')
    ->set('domain_path', 'staging-api.linquito.com');

host('production-api.linquito.com')
    ->hostname('255.255.255.255')
    ->stage('production')
    ->user('ubuntu')
    ->set('deploy_path', '/var/www/production-api.linquito.com')
    ->set('domain_path', 'production-api.linquito.com');

after('deploy:failed', 'deploy:unlock');

// Custom tasks remove any that are not relevant to your application
desc('Execute artisan horizon:publish');
task('artisan:horizon:publish', function () {
    run('{{bin/php}} {{release_path}}/artisan horizon:publish || true');
});

desc('Execute artisan telescope:publish');
task('artisan:telescope:publish', function () {
    run('{{bin/php}} {{release_path}}/artisan telescope:publish || true');
});

desc('Execute artisan nova:publish');
task('artisan:nova:publish', function () {
    run('{{bin/php}} {{release_path}}/artisan nova:publish || true');
});

desc('Deploy the application');
task('deploy', [
    'deploy:info',
    'deploy:prepare',
    'deploy:lock',
    'deploy:release',
    'rsync',
    'deploy:shared',
    'deploy:vendors',
    'deploy:writable',

    // Laravel steps
    'artisan:storage:link',
    'artisan:view:cache',
    'artisan:horizon:publish',
    'artisan:telescope:publish',
    'artisan:nova:publish',
    'artisan:config:cache',
    'artisan:route:cache',
    'artisan:optimize',
    'artisan:migrate',
    'artisan:db:seed',
    'artisan:horizon:terminate',
    'deploy:symlink',
    'deploy:unlock',

    'cleanup',
]);
after('deploy', 'success');

before('deploy', 'slack:notify');
after('deploy', 'slack:notify:success');
fail('deploy', 'slack:notify:failure');
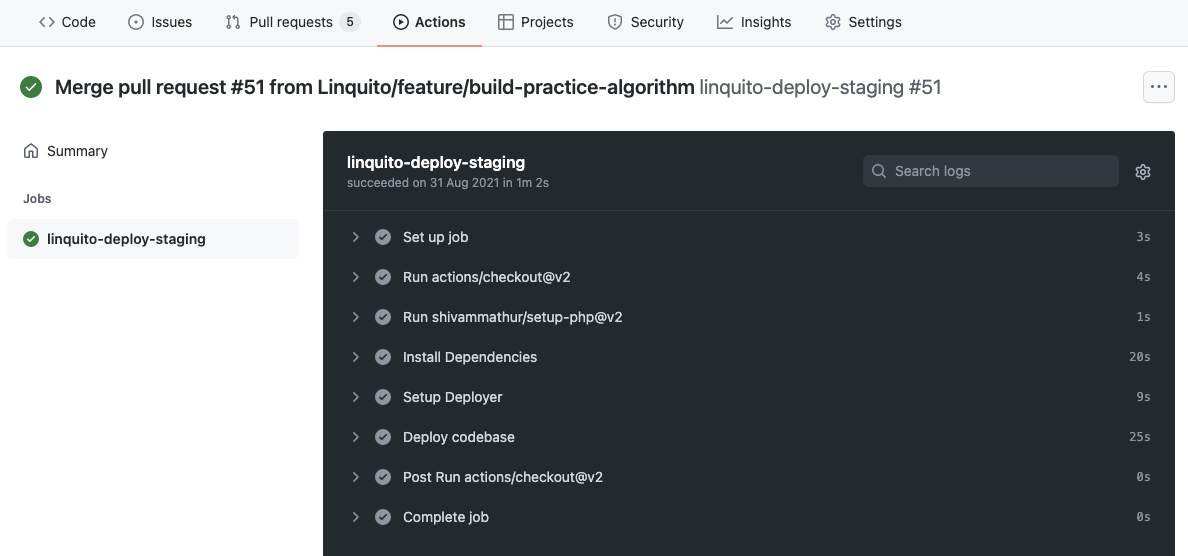
Now, next every time we merge to master we can see our job execute automatically on the Actions tab for the repository on GitHub. You can also expand and see the full CI logs which can be helpful for debugging if the job fails.
Production deployments
For our production deployments we want to follow the same steps and tasks as for staging but with the difference that we want to target our production servers and only trigger when a new GitHub release is created (as opposed to when we merge to master).
For this we can create an additional workflow .github/workflows/production.yml. The main difference here is we will use production secrets (a different ID_RSA_PRIVATE key, known hosts etc) and we will change the events the workflow reacts to by targeting published releases. The same deploy.php file can be used and the only difference when using Deployer’s dep command is we specify production as the argument instead of staging. This picks up the production tagged hosts in the deploy.php file.
name: linquito-deploy-production
on: # Now we only target releases
  release:
    # This will only run when a new release is created AND published
    types: [published]
jobs:
  linquito-deploy-production:
    runs-on: ubuntu-latest
    steps:
      - uses: actions/checkout@v2
      - uses: shivammathur/setup-php@v2
        with:
          php-version: '7.4'
          tools: composer:v1
      - name: Install Dependencies
        run: composer install -q --no-ansi --no-interaction --no-scripts --no-progress --prefer-dist
      - name: Setup Deployer
        uses: atymic/deployer-php-action@master
        with:
          ssh-private-key: ${{ secrets.SSH_ID_RSA_PRIVATE }}
          ssh-known-hosts: ${{ secrets.SSH_PRODUCTION_KNOWN_HOSTS }}
      - name: Deploy codebase
        env:
          SLACK_WEBHOOK: ${{ secrets.SLACK_WEBHOOK }}
        run: dep deploy production --tag=${{ env.GITHUB_REF }} -vvv
Now, every-time we create a new release on GitHub for Linquito’s repository. GitHub Actions should automatically run the production workflow to release the updated codebase to our production servers. This typically takes about a minute to deploy!
Summary
This post outlines how we used GitHub Actions and Deployer to create a relatively simple CI/CD pipeline which would be adequate for many smaller/medium sized projects. The benefit to this deployment is it can be relatively fast! For Linquito we typically deploy within 1-2 minutes. You can also use Deployer for multi-server deployment if your site sits behind a load balancer and your scale starts to grow.
Hopefully this will help inspire you to adopt some basic pipelines for your application using GitHub Actions and/or Deployer!
For more info on Deployer you can read the documentation [here] and GitHub Actions documentation [here].